Sven and I took some time lapse video of the assembly and mounting bikes on the first contestant in our Fat Hitch Rack Shootout and all of our testers have chimed in with their impressions of how each rack performed. Of course, this is all leading up to Saturday, when we reveal how each of our 4 racks stacked up against one another in an old fashioned magazine shootout. So today, let’s take a look at the 1Up USA rack.
This is what Evan had to say about the 1Up –
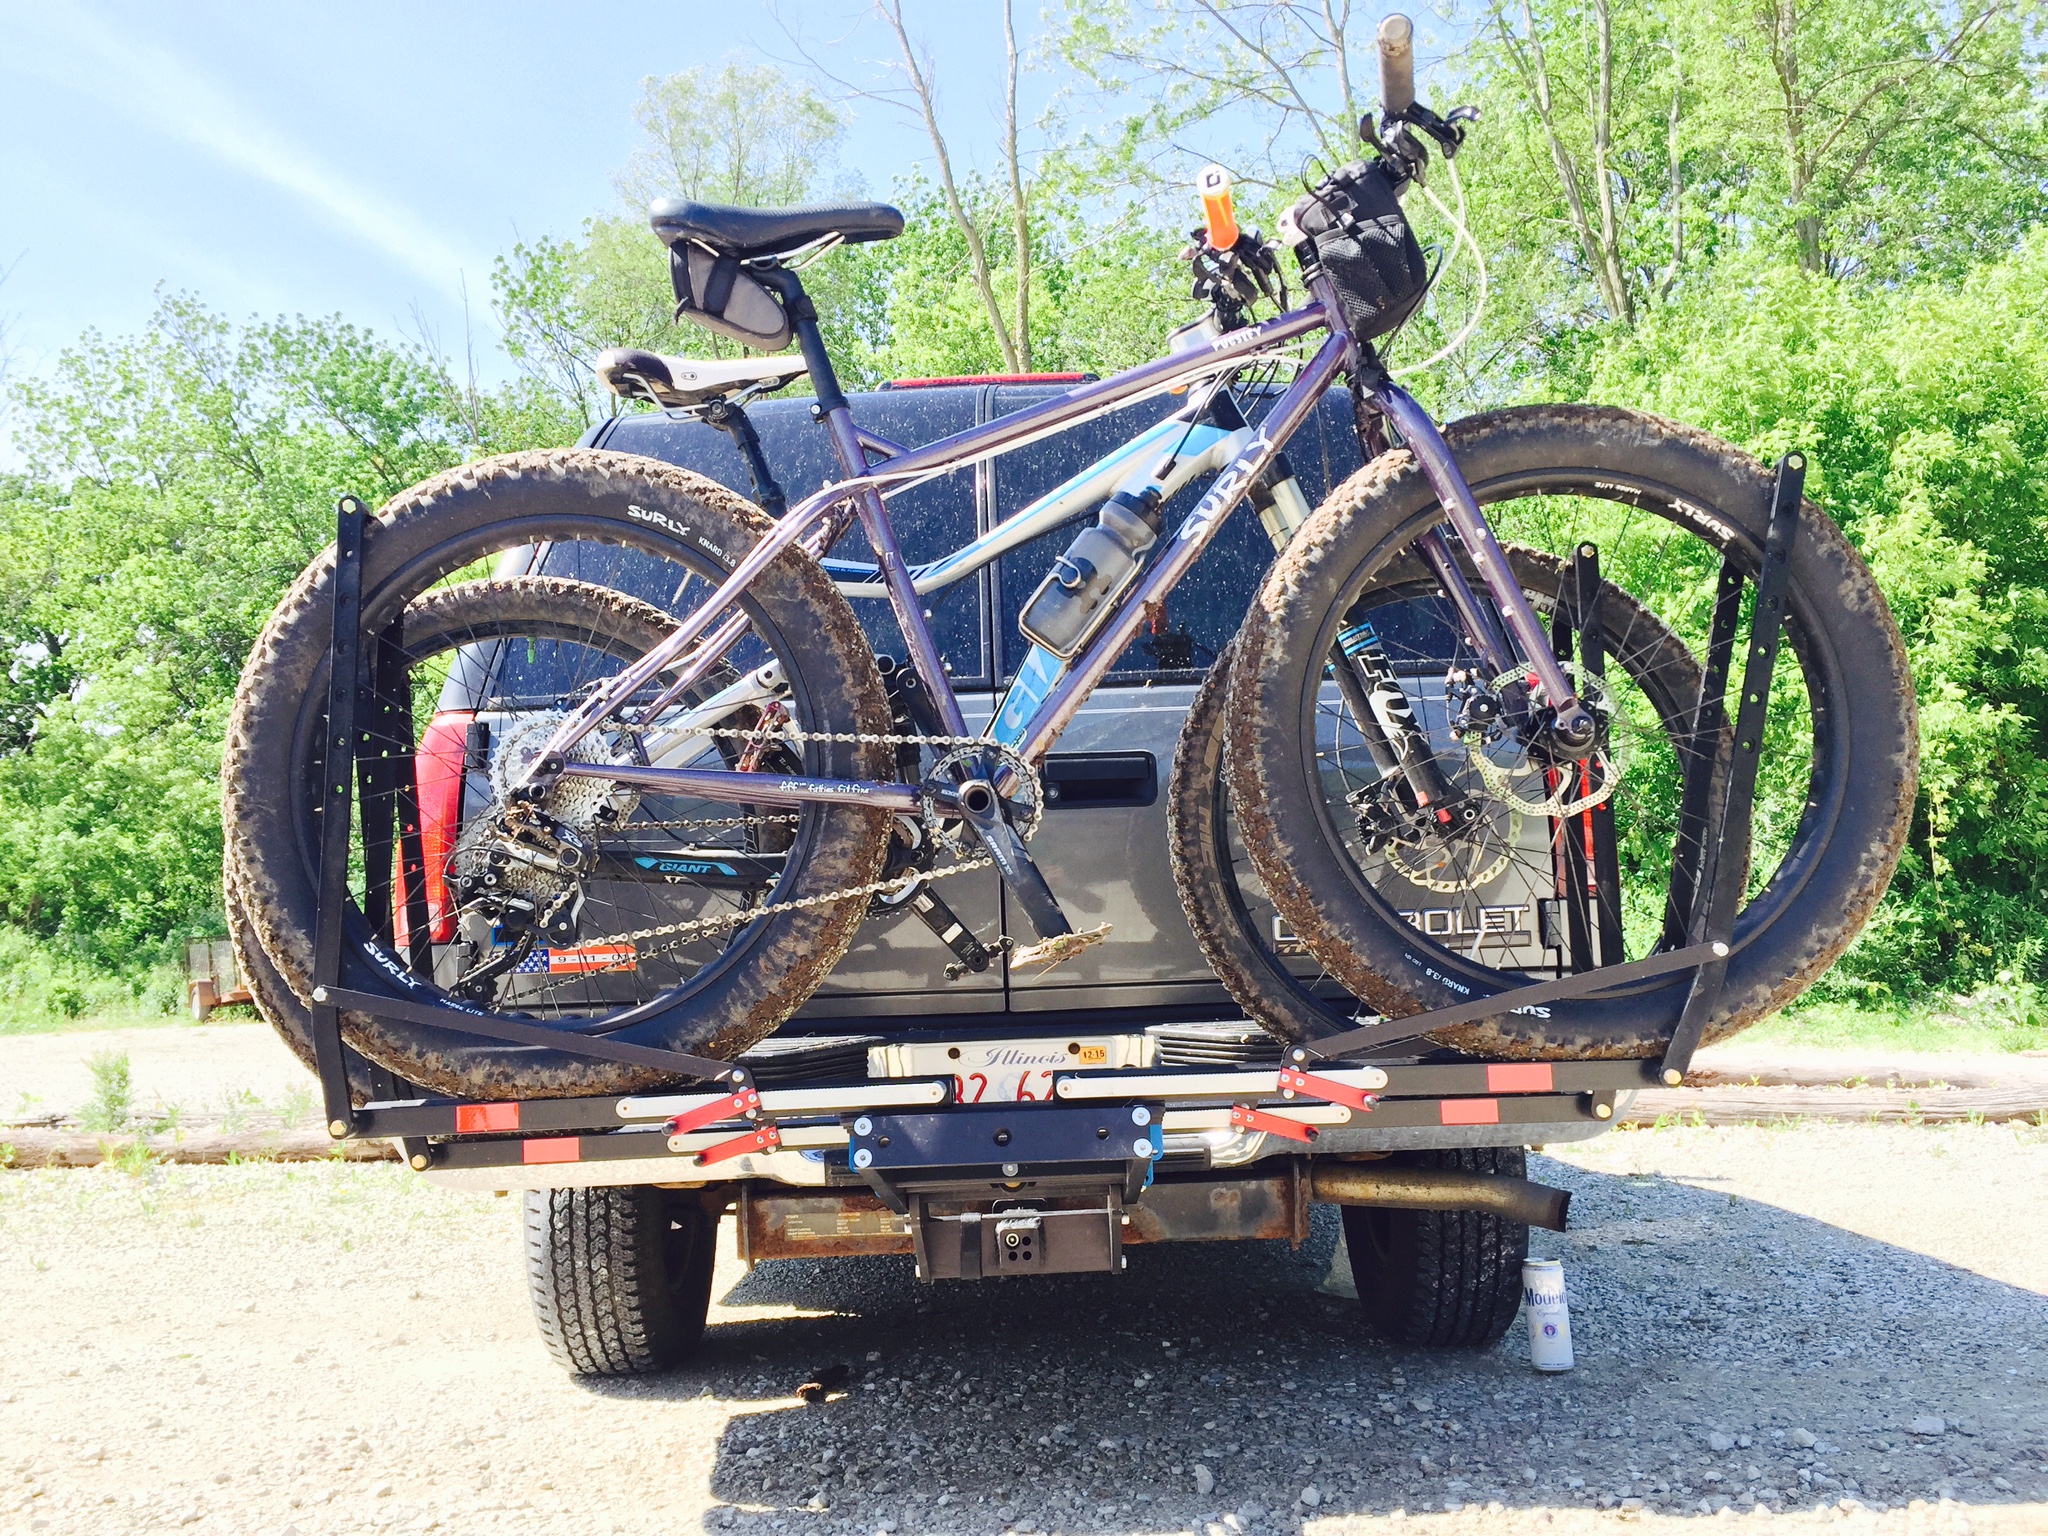
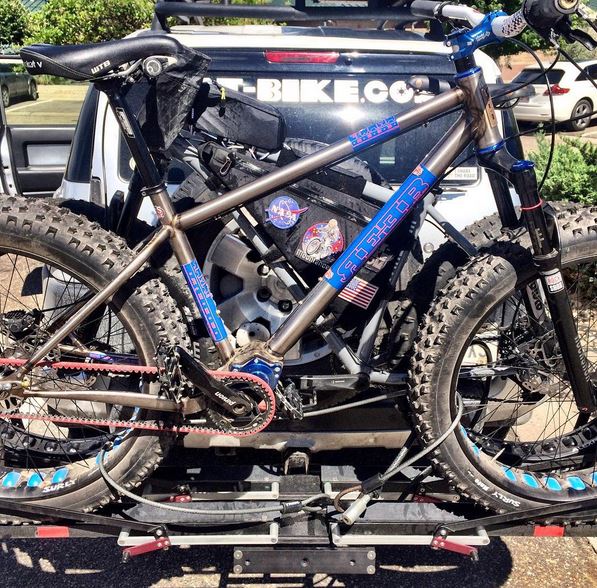
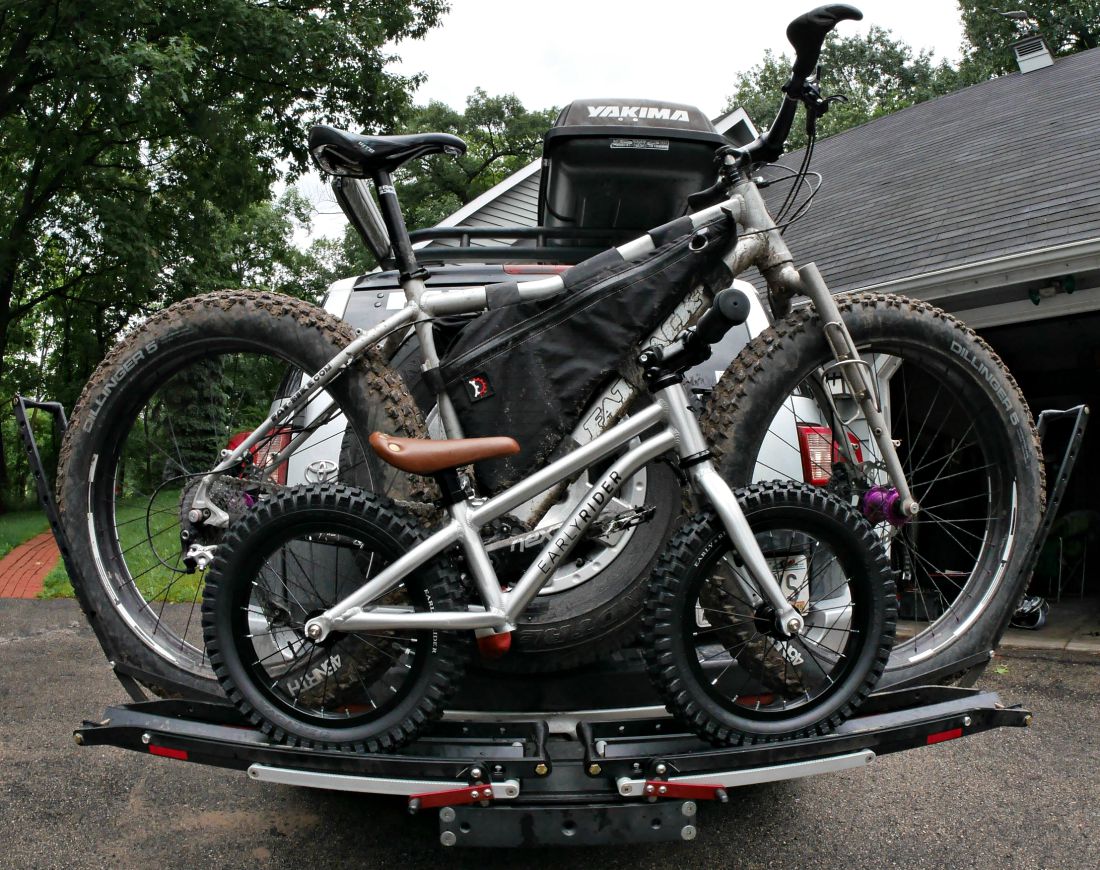
Upon my arrival to Uncle Gomez’s forward command post, I noticed an object that resembled something that could belong to NASA. The sharp looking CNC machined aluminum pieces are fastened together using stainless steel nuts and bolts. The main mounts are attached using stylish tapered allen bolts for a very clean look that screams made in America. Asking Uncle G for a hand with the rack, he let out a slight chuckle, telling me to give it a lift. The weight comes in at 46lbs. which I felt was high for an all aluminum rack, but I easily installed the collapsed rack into my trailer hitch with a little help from a friend. There is no pin or threaded bolt to retain the rack, but an “expander bolt” that’s built into the rack itself. I secured it with a few turns from a tamper proof allen and boom, it’s attached! If you’re like me, who believes anything can fail, never fear! The folks from 1UP acquired a fantastic device that can keep your fancy new rack from falling of your ride. Yep, VELCRO!!! Now that you can travel stress free, let’s look at how the fun machines are loaded up.
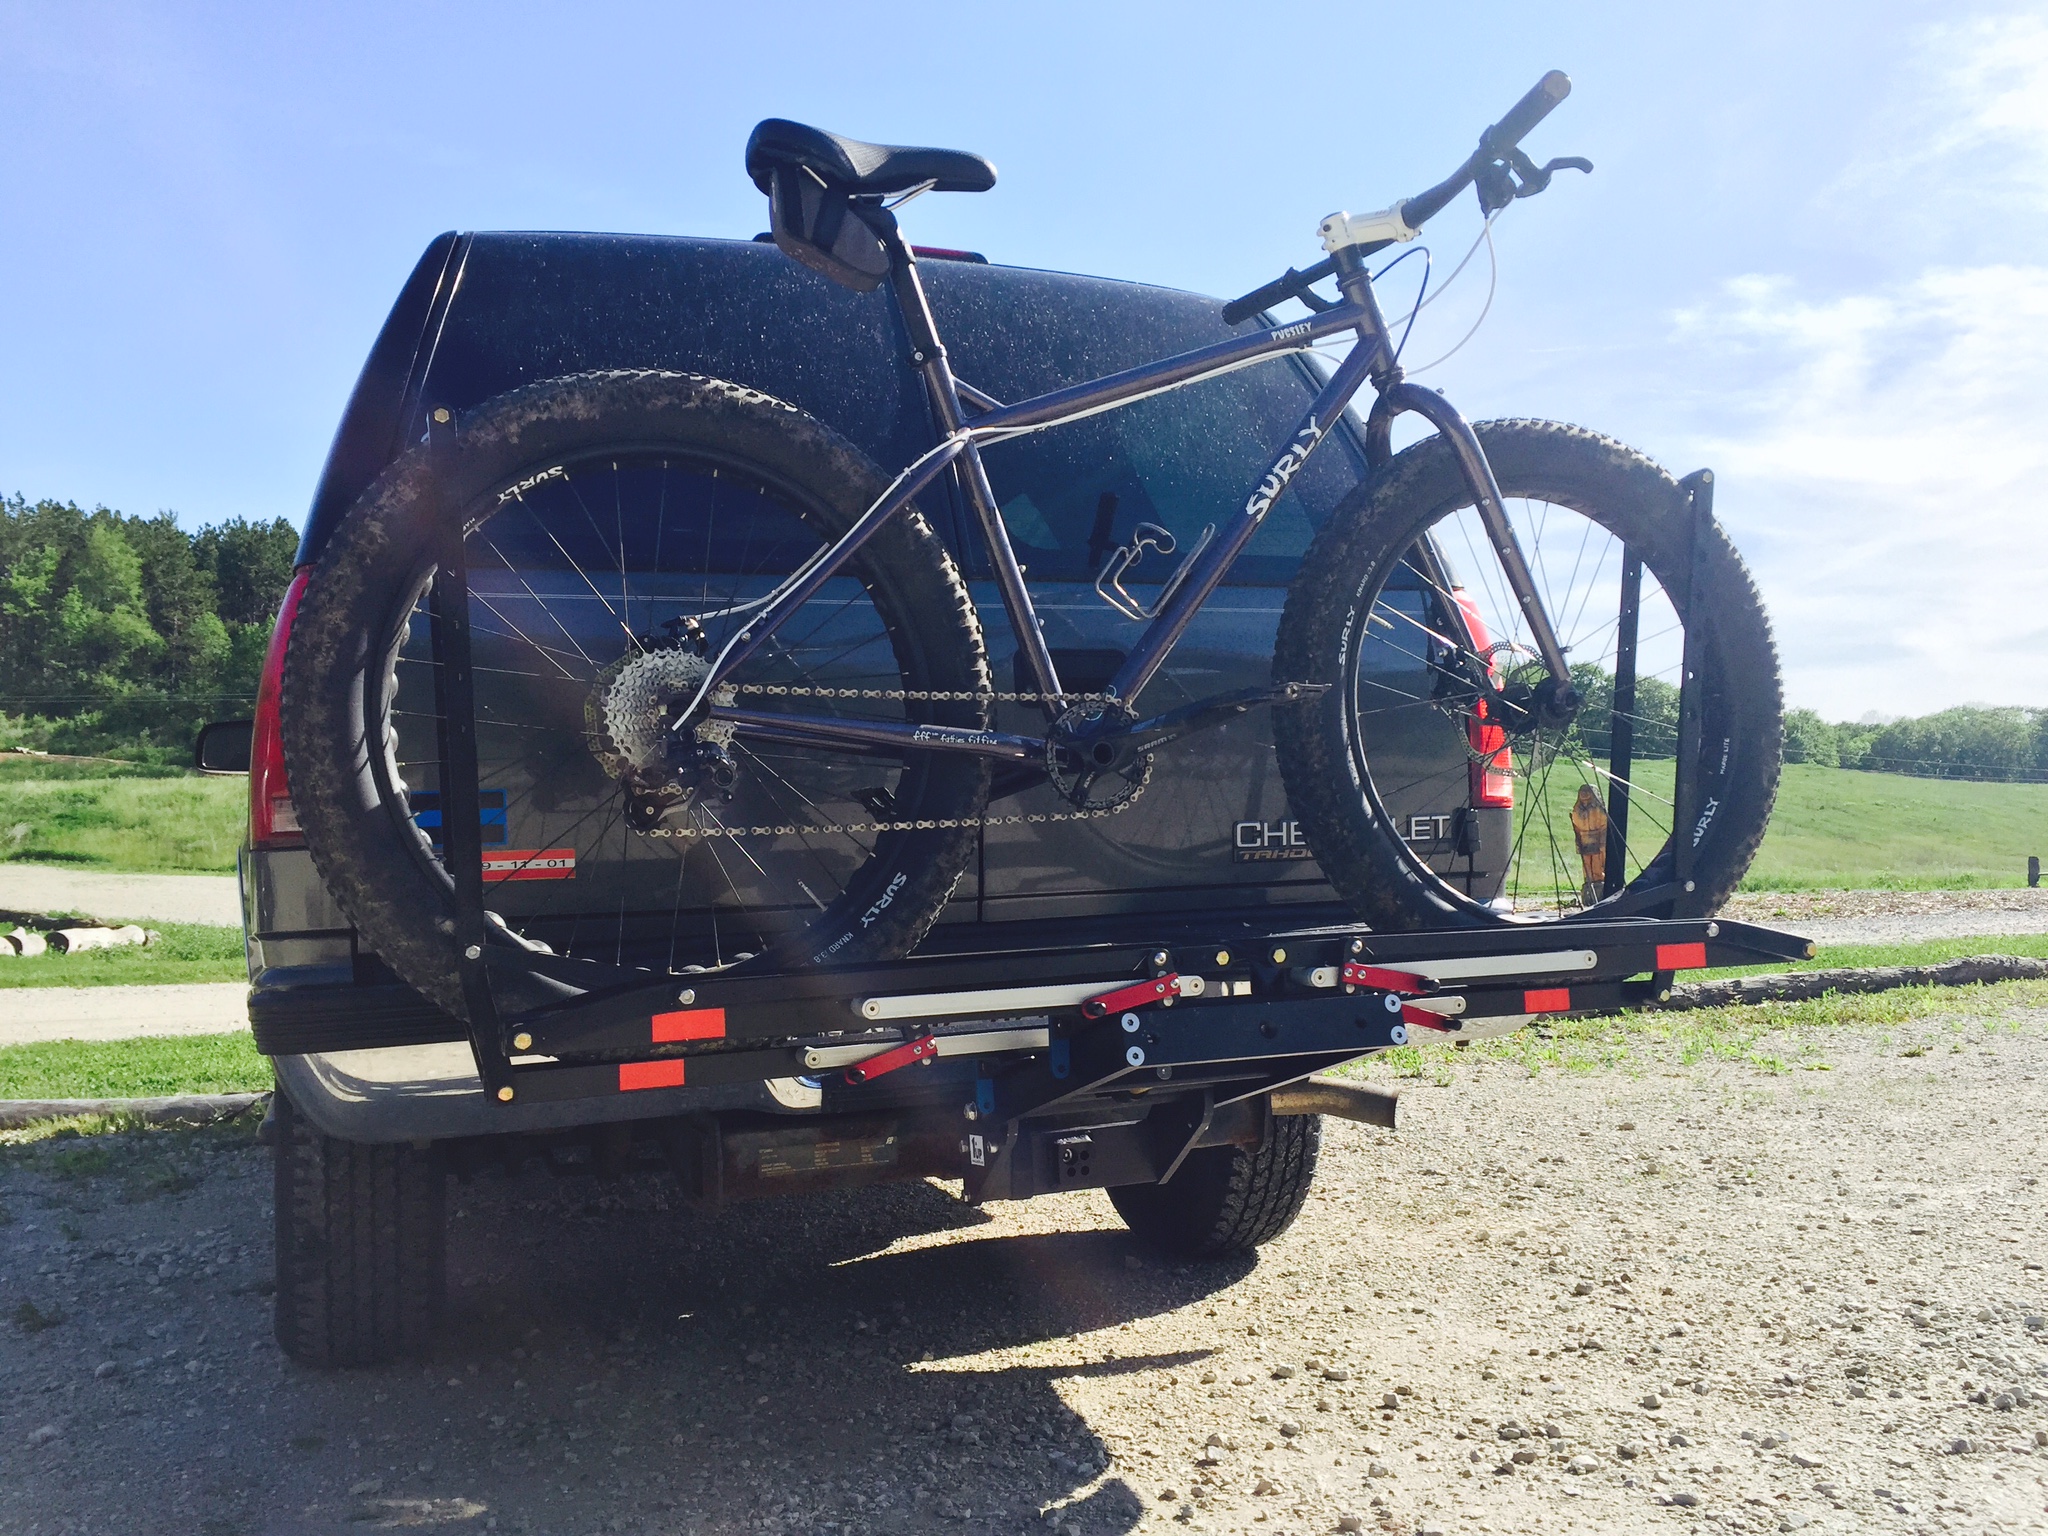
Folding down the rack took a second, due to me not reading the instructions first, but after finding the release handle in the lower middle of the rack I set it to the loading position. Small, anodized, red handles need to be lifted in order to open the arms. Setting the bike onto the rack, I easily reached the first arm. While balancing the bike in place, I brought the arm up to the sweet sound of aluminum teeth clenching down letting me know that bike’s not going anywhere. The bike stayed in place with only one arm set and after lifting up the other arm it brought the bike and rack firmly together. When looking at the rack from the side, you can see the mounts are staggered which keeps the spacing tighter and also helps with the saddle and handlebars layout. (Some other racks have issues with this overlap.) I mounted up my CX, 4″, 5″FAT, 26″, 27.5″, 29″ and a few of my friend’s trail bikes without any problem. (I think one was even an enduro bike.) As with any rack setup, it takes a moment to figure out which direction each bike should be facing but once you know, you’re good to go. When securing the thinner wheel bikes I noticed that you could almost over-tighten the arm causing the tire to bulge out. Also, when traveling the CX bike tended to “wobble” around a lot more than any others. It didn’t fall out no matter how hard I shook the bike around, but seeing it shimmy whilst driving was unsettling.
When unloading, there is a teeny tiny learning curve. To release the bike, I found if you push on the arm a bit, it helps to release the locking mechanism before lifting the red handle. Also, only lower one arm all the way, release the second arm just enough to remove the bike. If you do lower it all the way you better have another person to catch your bike from falling off the rack or into your ride. Again, a small learning curve that is easily overcome.
Overall, I feel this rack is a fantastic tool that performs extremely well. I’d like the addition of a pin to go through the rack and hitch to keep my mind at ease but what’s a cyclist to do? The build is super clean and the rack looks sexy as hell, even when folded and stowed on my truck. Oh, did I mention it’s made in the U.S.A.? You say you don’t care about that stuff, well then take your commie ass back to China! The fact that you can add another section to make it a 4-bike rack is a great idea. I also appreciate the fold down capabilities to access the cargo area of my Tahoe. 1UP is a rack I would certainly recommend to anyone and I’d love to ditch my current setup held together with bungee cords for this one. Maybe someone (wink*wink*) will be good to me on Christmas this year because I couldn’t justify spending over $600 on a rack. If you can though, spend the money.
Next up, we have Julio’s thoughts on the 1Up. Apparently the 1 Up is called the Quik Rack……either that, or Julio just made that up…
1UpUSA Quik Rack
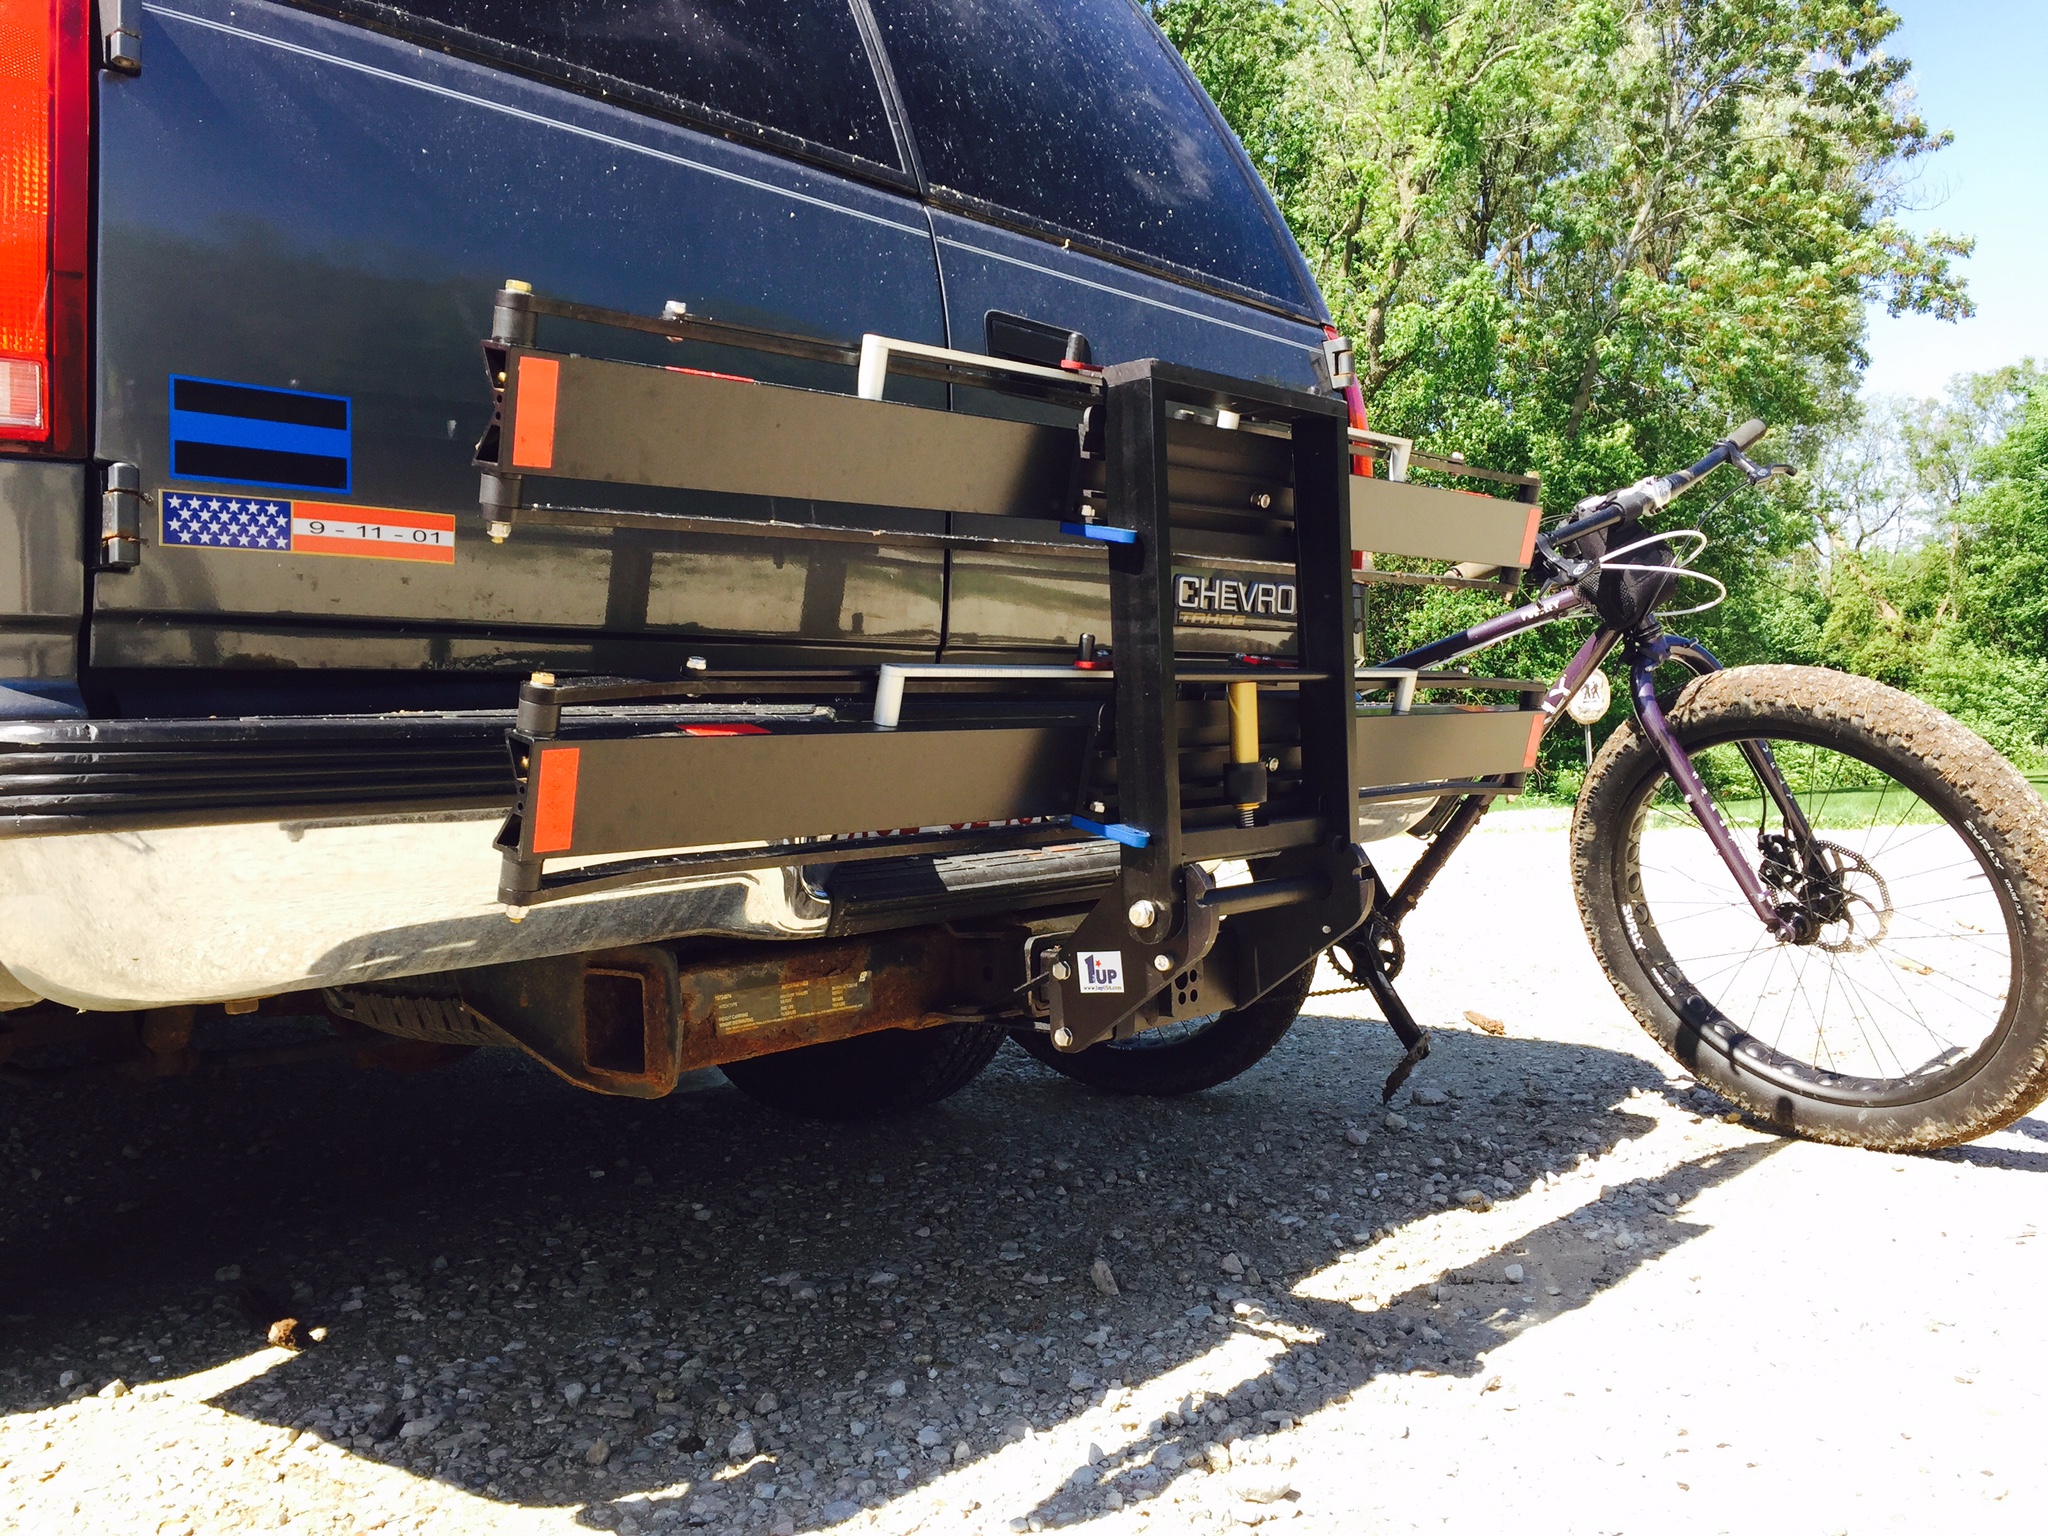
Right off the bat you can tell that the 1UP USA rack is well put together and all materials are top notch (No plastic! And made in the good old U S of A!). This is a good-looking rack in an industrial sort of way. This heavy-duty construction comes at a weight penalty, as the rack is pretty heavy and can be a bit cumbersome to carry. It also occupies a big footprint when storing and due to the nature of the rack, needs to lean against something to stay upright unless you lay it flat on the floor, which takes up even more space. Installation of the rack is pretty straightforward. Insert the rack into the receiver and tighten the tamperproof hex bolt to snug up the rack. However, this is also my biggest complaint with this rack. No hitch pin. Not even a place for a hitch pin. I was really surprised by this, especially on a rack this well thought out. All that is securing the rack to your vehicle is a “tamper” proof hex bit that tightens an expansion ball (oh, and a piece of Velcro they give you to act as a safety strap). I’m sure it wouldn’t take much for 1UP to drill a hole through the rack to allow for the use of a locking hitch pin. You can buy a locking pin from 1Up that blocks access to the tamper proof bit but this is not included in the rack. Speaking of security, the stock rack has no means to lock bikes to the rack so you’ll have to provide a cable lock or buy the wheel lock (or four) that 1Up sells separately.
The rack itself is very easy to use. There is small learning curve as to where to position the arms for the most secure placement/ease of loading as well as for hauling two bikes with no interference/rub. Once in place, the bike is pretty secure with just a little movement during transport. The ratchet arms have a very secure, reassuring action. However, I found skinnier tired bikes are not held as soundly and move quit a bit during transport. The bikes were secure, there’s just a lot of movement since the arms are so far away from the tire and there’s a much smaller contact patch with the tire itself on smaller sized tires. This is even more apparent with high PSI tires since the arms can’t compress onto the tire as well. With the low PSI of fat bike tires, this is not a problem. Once loaded, the rack drops down (although the release is in an odd to reach spot with the bikes loaded) to provide access to the rear of the vehicle. Overall, the 1Up USA rack is a well-built, well thought out rack that more than gets the job done with some made in the USA industrial style.
My time with the 1Up coincided with a long road trip from Wisconsin to Utah. I should probably start by saying that I really prefer to transport my bikes inside my truck. Hitch racks put your bike out in the weather and place them in the vehicle’s crumple zones. But I know that not everyone has a vehicle where that’s a possibility. All of my ratings are compared against just rolling my complete bike into the back of my truck vs. how easily a bike mounts on these racks and how the rack gets out of the way, so I can utilize the back gate of my truck. This was especially important, while I was camping and overlanding during my three week journey out west.
The 1Up is very well made. Very solid with the best fit and finish of all of the racks that we tested. Assembly was very easy and bike mounting was the easiest that I’ve ever encountered. The rack handled the widest tires mounted on 100 mm rims and held my 29+ Krampus, just as well. I get to ride a nice variety of bikes and the list of bikes that the 1 Up carried included a REEB Pinion equipped B’donk and an Advocate Cycles Watchman. I really liked the fact that the rack both folded flat against the back of my rear mounted spare tire and dropped down towards the ground that allowed me to fully open the rear door on my FJ to access camping gear, etc.

The only area of concern I have with the 1 Up is the lack of a hitch pin to secure the rack to the two inch receiver. The lack of a pin does allow the rack more fore and aft adjustment to accommodate things like rear mounted spare tires, but made all of our testers scratch their heads as to why they chose to omit that feature. I drove over 2500 miles with the 1 Up and it never budged and inch during that time and I also drove on lots of sketchy dirt roads all over Utah and Colorado, getting lost and eventually finding trailhead parking lots. That should make me a believer, but a pin still seems like such an easy insurance policy. The one up is perfect for Otis, and could accommodate my grand daughter’s fat strider! That’s amazing, because that tiny little bike can almost fit in the glove box 😉
The 1 Up performed great for me the entire trip. At $609 the 1 Up is the most expensive rack that we tested, but folks with high end bikes will love the fact that the rack holds the tires, with no metal parts touching the frame or fork. This is especially important to owners of carbon fiber frames.
For more information about 1Up USA visit – www.1up-usa.com
I bought one of these and I absolutely love it. I know it’s a pricey option, but I like knowing that I helped support a company making their products here.
I think people are a little too hung up on the lack of a hitch pin. Out of anything that I have ever stuck in a 2″ hitch this rack has got to be the most secure feeling, wobble free device ever. Yeah I suppose that somehow that bolt could loosen up over time…maybe. But you aren’t putting any forces on it that would pull it out of the hitch, as soon as it started to loosen up you are going to see the whole rack begin to wobble, and like they said there is the little velcro strap that is going to stop it from working it’s way out.
1 Up = A+
I’ve got 1UP trays on my roof and a one of their single hitch racks with an add on for the back. I really like them better than anything else I’ve used. There’s an error in this review i’d like to point out. You absolutely can carry bike with fenders and little 20″ kids bikes on these racks, I do it all the time. You just have to move the cross bars down in the arms. That’s why there’s a bunch of different holes to pick from. Seeing as moving them is a pain I made myself a couple of extra ones with T handle nuts that I can pop in whenever I gotta carry a kid bike or one with fenders.
How does the rear full coverage metal/plastc/wood fender not get crushed by the crossbar? I see that they make a cushioned fender accessory, but I think my Velo Orange fenders would get either crushed or the bike would not be secured into the rack, but I guess with an extra strap for security it could be done. I bet with the cross bar adjustments the rack could even carry that little strider with 14″ tires. So you’re right about the fenders and smaller wheel sizes. But the fender compatibility is contingent on how strong and rigid the fenders are attached to the frame of the bike being transported. It’s not what I would call ideal, but it can be done.
You don’t follow me. I’m not referring to the cushion they sell, I’ve never tried it.
You want to put the cross bar in a low enough spot that it will contact the tire not the fender.
I follow you for the front fender, but my rear fender is a full coverage fender, so the crossbar would have to press down on the fender to hold the bike securely. I have zero doubt that would damage the Velo Orange fenders that I use and for that matter any wood or plastic fender that I’ve tested. Maybe with extra straps to secure the rear tire with a full coverage fender, something could be jury rigged to make it secure. We agreed that it could be done, however, we don’t think it’s a great fit. Wait till you see the Yakima Two Timer and you’ll see a great fit for bikes with fenders.
I haul a city bike on my one up rack from time to time. It has a full rear fender along a front fender. The solution for me is using A couple of blocks of dense foam that came with some electronics I purchased and cutting it to serve as spacers between the fender and Point of contact with the racks ratcheting crossbar. I also stuff a work rag between the tire and the fender so that the rack crossbar piece does not compress the fender down onto the tire and distort the fender. Problem solved.
Is that a Brooks saddle on the earlyrider?
no
What fork does Sven have on his aPe? Great review round. A rack is something everyone needs. A rear rack in Alaska makes me nervous but they are easy to use.
I discovered 1up as an advertiser on this website earlier this year and ordered two roof top trays/units earlier this summer. Loved the fact that they are made in Wisconsin! With a family of five, I soon (approx. mid-August 2015) ordered the rear hitch mount (2 bikes) plus an additional two bike add-ons(for a total of four bikes) to replace my old Thule swing arm 4 bike rack (which was convenient on an SUV but did not live up to the promise of carrying 4 bikes, at least not without deep gouges in paint jobs). I am absolutely in lust with 1up’s system.
The rear hitch system is solid. I too was worried about the lack of hitch pin and, as a result, have been checking the connection every week with the included Allen key. To date (9/29/15), I have had zero movement with the ball connection. I have been checking the connection every week and it is as solid as the day I installed it.
I love the fact that I can carry a variety of bikes, at one time, and they don’t touch each other! I carry everything from road bikes and cross bikes to mountain bikes, fat bikes, and kids bikes (using Dave’s method pointed out above) with no problem (nothing with fenders to date). I do notice the slight cavitation on the road/cross bikes when mounted on the back rack due to wind buffeting, but the movement is less than I had on my Thule Swing Arm and, quite frankly, you get used to the slight movement after a while. After hauling such bikes for over 200 miles to date at highway speeds, I’ve had no issues. Fat bikes and mountain bikes don’t move, at least not in my experience.
The hitch rack is a heavy lady when you have all 4 bike mounts secured. As a result, I frequently remove the 2 add-on racks when not in use and just leave the two bike hitch system on. When you are using all 4 mounts, the bikes like to bounce a little on the back, a trampoline effect of sorts. It causes me minor rapid heart palpitations when going over bumps and gravel roads. I assume that all that weight is the culprit for the movement. I’m wondering if others have the same experience? I’m hoping its not my hitch telling me it’s loose, yikes! Anyone else? I also wonder if the experience would be the same with the Kuat NV with all 4 bike trays in use? I’m guessing yes only because of the weight issue but would invite feedback.
As for security, a 10 foot cable and weather resistant lock cured the issue and I believe offers more flexibility in securing the bike(s), not only to the rack but to each other.
Oh, I’d be remiss if I did not talk about its looks. It looks sweet, plain and simple. Come on, you know you want to instill rack envy.
Gripes, I have two. First, the $19 hitch bar lock should be included in the price as standard. The racks are crazy expensive and a premium product should include this relatively inexpensive item. Second, when you have all 4 bike trays mounted on the hitch system, it takes a feat of strength and acrobatics to disengage the locking mechanism located close to the hitch in order to move the rack system up or down on its swivel. Some sort of removable strap that runs to the last rear tray would be a godsend to release the lock bar. I’m currently trying to jerry rig something to serve this function.
Thanks Fat-Bike.com for the thoughtful reviews.
@ Luis – can you go over how you yourself reach the release lever when fitted with 4 trays? To go from horizontal to stowed (vertical) position, it seems very difficult to reach over the 4 trays to the lever underneath and pull up the rack at the same time.
And if you had 4 bikes loaded, and wanted to lower the rack for access to trunk space, how feasible is that?
I raise my rack with 4 trays installed (and I’m only 5’6″). I grab the back of the rack with one hand, and reach over the rack to the release with the other. You should be able to move the release enough to unlatch the lock and pull up on the rack. Once it reaches the middle position, you can easily reach the release from underneath.
I would not advise trying to lower the rack with 4 bikes loaded.
Jason: I purchased three Velcro toolholders from Home Depot to make a release mechanism that I run to the front of the rack. The toolholders are essentially a long Velcro loop attached to a carabiner. They are called the “Husky 24 inch zinc plated steel hang all”. You can find the tool holders that I bought here:
http://m.homedepot.com/p/Husky-24-in-Zinc-Plated-Steel-Hang-All-36287/204695688?MERCH=RV-_-rv_mobileweb_rr-1-_-NA-_-204695688-_-N
I take two of the tool holders and loop the loops around either side of the locking release mechanism. I then a take the third toolholder and connect the carabiner end to the carabiner ends of the other two toolholders and then loop the third tool holder on to the rear end of the rack. Now I just have to hole on the third to hold holder to release the locking release mechanism. You can see a picture of what I’ve done here: you can see a picture of what I’ve done here: https://flic.kr/p/Lyh1ki
Also, it’s been over a year since I’ve had the rack on my SUV. No problems, no incidents. Still love the rack and would buy it again in a heartbeat.
One follow up: I have the wider fat bike spacers installed on all of the rack trays. I don’t know if the movement I describe above with my road/cross bikes would occur with the standard spacers that come with the rack.
They now offer an accessory to use with road bikes for better stability. But I have the fat bike spacers and have not had any issues with the road bikes.