
Sno-Blaster on left, Path-Master with Sno-Razor on the right
In recent years there has been an explosion in the number of groomed fat bike trails. During this trend, we have seen a huge variety of different grooming solutions from homemade contraptions to companies selling finished products. Rollers were sort of the first wave of successful fat bike grooming implements because they could be pulled easily with a lower power vehicle and gave the ability to get a lot of ground pressure (and therefore good snow compaction). Rollers are great for a lot of things but in general they don’t do a very good job of leveling nor renovating groomed trails; they are kind of blunt instruments in that respect. The two groomers we have to test expand on what a roller can do. These two groomers leverage years of cross country ski grooming and plow technology. Snowgroomers is a good example of a company with a successful ski grooming history that has ported their experience over to fat biking but has also included some plow technology.
Before I get into specifics about the groomers themselves I am guessing people may be interested in hearing about the company which isn’t yet a household name in fat biking. Snowgroomers was started in Northern Michigan in 2001 by Rick Byer. Rick, like a lot of winter enthusiasts, started from a love of snow and wanted to make it better to play in. Over time this spawned Snowgroomers:
“I wanted to make great trails, in all conditions, right at home. I developed three low-resistance sleds that float on top of the snow, pulled right behind my own snowmobile at 12-15 MPH. Fresh powder can be compacted quickly, without the need for a separate roller implement. Hard packed snow and even slush is easily leveled and molded into corduroy or tracks.”
“Just like the idea was built in Northern Michigan, so is the product. The heavy gauge steel sleds, stainless steel hardware, and plastic/urethane components are all assembled in our trailside facility and built “the old fashioned way” to last a lifetime.”
One of the key takeaways from this is that the groomers are built to be low resistance so they are easy to pull. This is very important in fat biking because we generally are using underpowered grooming equipment (I am looking at you Rokon and vintage or “mini” snowmobiles) on narrow hilly trails. Our grooming vehicles just don’t have a lot of oomph so low resistance groomers are very important if you want to spend more time grooming and less digging out and/or fixing equipment.
Rick hooked us up with two different groomers to test: The “Path-Master” with the “Sno-Razor” and an “Sno-Blaster.” They share some common components but are distinctly different tools. We have been using these out at the Big M near Manistee, MI and have been pulling them with our Yamaha long track snowmobile. Up until this point, we have only been using a roller and pan to pull behind the snowmobile (we also use a Tracksled groomer for some of the trails at Big M).

Path-Master with the Sno-Razor Attachment
The Path-Master can come with the Sno-Razor or just on its own. The Sno-Razor part is the telescoping toothed blade near the front of the groomer.

The back half of the Path-Master is a compaction pan with flexible “wings” off the sides. You can get a variety of different length wings (6″, 8″ and 12″ in two thicknesses) to customize the total width of the groomer. Our’s came with the standard 12″ wing set with thicker material. The Path-Master is basically the same thing as their classic ski groomer without the two blocks on the bottom which cut the classic track. Stealing a design from years of cross country ski grooming makes a lot of sense because it has been refined over many years.
The compaction pan is designed to hold two concrete blocks, has a plastic cover for the blocks and has nice attachment points for bungee straps to keep everything in place. We are using two 4″x8″x16″ blocks which weigh about 36 lbs each but the tray is designed so you can also use a taller 6″x8″x16″ block which weigh 55 lbs each for some additional compaction.

The bottom is all high-density plastic which slides on snow very easily except. The one exception is the yellow metal sides/skegs that prevent the pan from sliding sideways on off-camber trails or going around corners fast. The trailing edge is a traditional XC “comb” that will leave pretty corduroy behind the groomer. The wings are flexible so if you tag a tree or there is a ton of snow they can flex out of the way. The effective packing width of the pan is 20″ wide and the wings do compact the sides a bit but nothing like the pan area. There are other widths available if you are looking for something a wider.

There are a few different options for the hitch. Shown above is a standard pintle style ring but they also have a pin style that works with the stock hitch on a lot of snowmobiles. There are also 3″ and 5″ couplers if you have a taller hitch on your vehicle. A feature that I really like and that shows this design has been used for many years is the shear pin that connects the hitch to the groomer. It is just a regular nail that will shear off instead of allowing damage to the groomer, coupler or vehicle pulling it. Little details like this are what allow you to use a groomer like this for years and years while avoiding preventable and costly repairs to your grooming equipment. Speaking of price, the Path-Master goes for $999.95 with your choice of wings.

Snow-Razor Add-On for the Path-Master
The Snow-Razor consists of two parts that bolt to the Path-Master: A plastic shield and a telescoping serrated knife.

The serrated knife can be raised and lowered to cut off a specified amount of snow from the trail. This may be the tops of lumps that have formed or you may want to skim off a bit of old snow to combine with any new snow you have to allow your base to set up better. You can change the angle of the knife as well as the height. Once again, the design includes a shear bolt so if you whack something like a rock or stump you won’t damage your equipment and can be back up and running by replacing a cheap bolt. It is very easy to make small, a fraction of an inch change to the depth of the knife so you don’t take off more than you want and you can also raise it all the way up and out of the way if you have a bunch of new snow and just need to compact it. Raising and lowering the knife can be done by hand by loosening and tightening the knob on each side. To change the angle of the blade you need a wrench so that isn’t as convenient (but you don’t need to do it very often).

The plastic shield works in tandem with the blade. The blade cuts and lifts the snow up which causes the snow to mix together and the plastic shield directs the snow back down so it compacted by the pan. Above is an “action” photo and you can kind of see how the snow is lifted by the blade, hits the plastic shield and then is directed back down for compaction.

So why is this important and/or different than what a standard roller can do? The above pic is one good example and was taken while fixing our fat bike trail after some snowmobiles rutted up a section. With a single pass, we were able to remove all the ruts and irregularities and leave a nice smooth trail. This also works great for fixing potholes left by walkers, ruts from cyclists with tires that are too skinny and/or high pressure, deer tracks… all the things that can ruin your beautifully groomed trails when temperatures are above freezing and are almost impossible to fix without fresh snow if you are using a roller and the temps are below freezing.
The other important aspect to the Sno-Razor is that it allows you to mix the old and new snow together. Just compacting snow (like with a roller or the Path-Master) is great if your new snow packs nicely and firms up. If you get a bunch of snow that doesn’t pack well, you can compact it all you want and it will still be soft and get chewed up when people ride it. You may need to go over a trail 3+ times before the snow crystals have broken up enough to want to set up well and form a solid base for riding. The Sno-Razor allows you to mix some of the older snow with the new snow and this will help everything to set up in a single pass.
In my eyes, the Sno-Razor is a must-have add-on for the Path-Master. Groomed trails are like a magnet for animals and humans to rut and pothole up and this allows you to easily fix the trails. It also is invaluable for getting difficult snow to setup without grooming for hours and hours. The cost for the Sno-Razor add-on for the Path-Master is $899.95.

Sno-Blaster
The Sno-Blaster takes an entirely different approach than the Sno-Razor. In this case, you have a V-plow that allows you to remove snow from the trail and throw it off to the sides.

There is 5″ of vertical adjustment to the V-plow giving you a lot of precision to skim off as much or as little snow as you want. It is easily adjustable up and down with a hand crank on the top of the groomer. Throughout the travel of the plow it stays horizontal to the ground so your trail doesn’t become concave or convex if the plow is at the extremes of its travel.

The front of the V-plow has a nice “shoe” to deflect the plow off of objects and the cutting edge of the plow is replaceable if it gets worn or damaged. The threaded portion shown above allows you to adjust the height of the plow so that the 5″ of range from the crank is in the correct spot for your hitch height.
I don’t have any action footage to share of the plow but it does a very good job of throwing snow up and well away from the trail. You would need to have very high banks and be moving very slowly for it not to be able to throw the snow up and out of the way. The V-plow also takes very little power to skim off a layer of snow. I was amazed by how much snow you can remove without it taking a ton of power.
The rear pan of the Sno-Blaster is basically the same design as the Path-Master above. It has the same construction for the pan, same customization options for the wings and the same concrete block system for weight. This is all a good thing because it is a highly refined design.
I have to say that I struggle with the concept of removing snow from the trail. Maybe it is the skier in me but under normal circumstances, my goal is always to keep as much snow on the trail as possible so we can develop our base and lengthen our winter riding season. Spring snow is generally the best snow so the longer it lasts the better in my eyes. That said, there is definitely a time and a place where it is appropriate to remove snow. Case in point, you get a monster dump the night before a big multi-lap race and there is no way you can turn the new snow into a durable enough surface to hold up. The cost of the V-plow add-on for the Path-Master is $999.95 or you can get the whole Sno-Blaster for $1999.95.
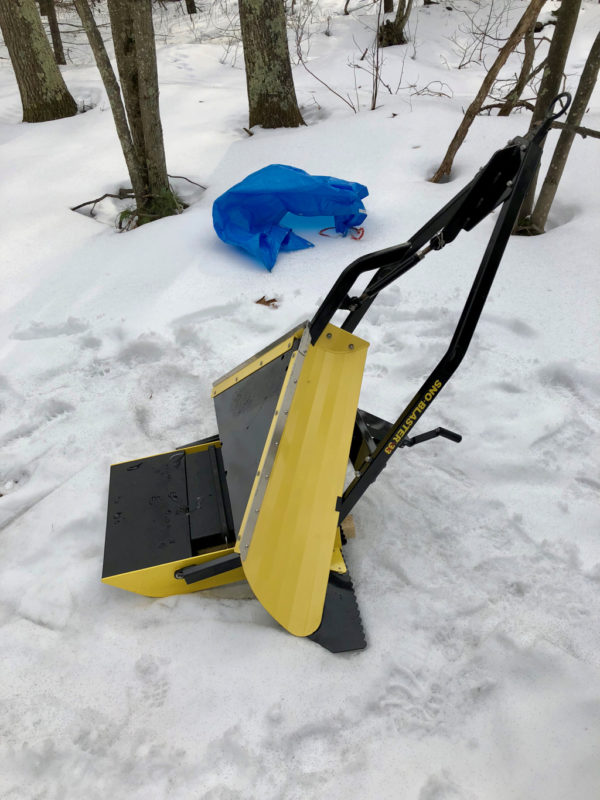
On both groomers, the front portion flips up so they take less room to store
Closing Thoughts
My fellow Fat Camp Podcast host Andy and I will be spending a lot of time grooming with these two implements and will share my thoughts on how they work. Right now I am very impressed with the quality and design of this equipment. Everything is designed well with drain holes and other features that will increase the longevity of the equipment. Materials are solid and burly without being overboard so the equipment will last but isn’t any tougher to move around than it has to be. The powder coating seems very durable and everything is well coated so rust should not be an issue for many, many years. I really like that shear pins/bolts are used to prevent damage to the groomer or pulling vehicle when you inevitably run into a stump, rock or tree. The designs are adaptable to a variety of pulling vehicles so if you need to change things up you will be able to cheaply switch the groomer over to a new vehicle. They even store easily because the front portion of the groomer can be flipped up decreasing the footprint that it takes up (see pic above).
More to come at the end of the season!
For more information visit – snowgroomers.net
I’d love to hear any follow up on these implements.
Me too, especially curious on use with very twisty trails where it will get banged off trees when navigating tight swtichbacks… We have a wildcat drag and have used it for several years now and thinking this might be a good compliment to it. We are finding a quiver of implements…might be the right solution. Private comments appreciated donatbarkermountainbikesdotcom
Can you tell us how they are working a few years later?